...currently reading.....
Kristin Lavransdatter, by Sigrid Undset...last read.....
Trout, by Ray BergmanEmbed? Win!
Fantastic Contraption
Powered by: MySpace Games >br?
Tuesday, March 06, 2007
HOW TO KNOW WHEN YOU'VE BEEN DOING A LOT OF WOODWORKING:
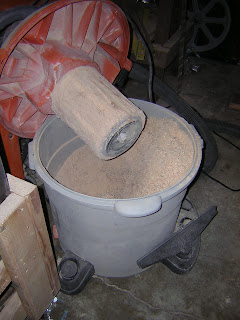
Well, for starters, you have completely filled a 16 gallon shop vac with sawdust and wood chips:
And for another, you have a nearly complete headboard to show for it (just need the cap):
 No, the headboard is not sitting in grass. That is our downstairs shag carpet. Well, one of the 3 patches of downstairs shag carpet.
-m
Well, for starters, you have completely filled a 16 gallon shop vac with sawdust and wood chips:

And for another, you have a nearly complete headboard to show for it (just need the cap):
 No, the headboard is not sitting in grass. That is our downstairs shag carpet. Well, one of the 3 patches of downstairs shag carpet.
-m
Sunday, March 04, 2007
PROGRESS
OK. Time for my semi-regular update on crib construction...
Here's the frame for the headboard, glued & ready to go. If you look closely, you can see 4 round metal things stuck in the leg on the right. Those are what you use to adjust the height of the mattress. The are strange little threaded inserts with non-continuous threads on the outsides and regular threads on the inside. I think the theory is that the wood expands and fills in between the "threadlets" on the outside so that it stays in place when you're putting in or removing the screws that hold the mattress springs:
 Here's the progress clamping the slats and slat retainers:
 Here's where it sits, as of 9:19 pm tonight. Should be able to finish the headboard by Tuesday evening. I need to glue in 6 more slat retainers, and then put the cap on the top. Oh yeah. I keep forgetting I need a plug cutter so I can fill the countersunk holes in the cap ends. Oh yeah, I also just remembered it would be handy if I had a real countersink, instead of just putting in a bigger bit. Once those steps are done, the headboard will be DONE, except for finishing. It is finish sanded (220 grit), but obviously haven't stained it or anything. I'm going to use 3 coats of linseed oil and 2-3 coats of beeswax or carnuba wax. Linseed oil just brightens the wood a little--it doesn't stain the wood, really. The footboard is almost the same, except it's shorter, and has a skinnier rail at the top.
 I'm pretty satisfied with the spacing. I'll end up having to special cut 2 slat retainers on each side, because I'm off about 1/8". Not too bad, considering there are 13 slats and 28 slat retainers, meaning I only got off 1/8" of an inch total in 82 cuts.
I'm feeling a little better about getting this done, but I'm starting to think about the sides now. The plans call for you to use 1/2" of oak plywood (two sheets of 1/4" plywood, laminated), but the 1/4 plywood I got was MUCH redder than the dimensional stock, so I'm thinking about using rails for the side. Also, I like the look of slats better than the solid panels. I will have to get creative, though, from an engineering standpoint. Those panels are in there to give it diagonal strength from front to back--which I would give up if I did it the same as the headboard and footboard (the slats are NOT glued, they are free so that they have room to expand/contract). The advice I got from the internet forum for the plans (I know...) was to construct the slats and the strip that holds the slats first (and screw and glue the slats in), and then glue the frame together around it. That seems risky, because I could wind up with a slat assembly that is 1/8" too short or long, which would really cause problems. I may default to the method in the plans...I was just hoping to avoid using plywood. As of now, everything is solid oak. Yeah..this thing is gonna be heavy. I'm hoping the result will be something the kid will have for the rest of their lives, and beyond.
By the way, it looks better in real life than in the images. It loses the look of the grain and the whatever-it-is-that-makes-red-oak-look-so-cool that it has in real life. Should stand out better once I put the finish on.
-m
OK. Time for my semi-regular update on crib construction...
Here's the frame for the headboard, glued & ready to go. If you look closely, you can see 4 round metal things stuck in the leg on the right. Those are what you use to adjust the height of the mattress. The are strange little threaded inserts with non-continuous threads on the outsides and regular threads on the inside. I think the theory is that the wood expands and fills in between the "threadlets" on the outside so that it stays in place when you're putting in or removing the screws that hold the mattress springs:
 Here's the progress clamping the slats and slat retainers:
 Here's where it sits, as of 9:19 pm tonight. Should be able to finish the headboard by Tuesday evening. I need to glue in 6 more slat retainers, and then put the cap on the top. Oh yeah. I keep forgetting I need a plug cutter so I can fill the countersunk holes in the cap ends. Oh yeah, I also just remembered it would be handy if I had a real countersink, instead of just putting in a bigger bit. Once those steps are done, the headboard will be DONE, except for finishing. It is finish sanded (220 grit), but obviously haven't stained it or anything. I'm going to use 3 coats of linseed oil and 2-3 coats of beeswax or carnuba wax. Linseed oil just brightens the wood a little--it doesn't stain the wood, really. The footboard is almost the same, except it's shorter, and has a skinnier rail at the top.
  I'm pretty satisfied with the spacing. I'll end up having to special cut 2 slat retainers on each side, because I'm off about 1/8". Not too bad, considering there are 13 slats and 28 slat retainers, meaning I only got off 1/8" of an inch total in 82 cuts.
I'm feeling a little better about getting this done, but I'm starting to think about the sides now. The plans call for you to use 1/2" of oak plywood (two sheets of 1/4" plywood, laminated), but the 1/4 plywood I got was MUCH redder than the dimensional stock, so I'm thinking about using rails for the side. Also, I like the look of slats better than the solid panels. I will have to get creative, though, from an engineering standpoint. Those panels are in there to give it diagonal strength from front to back--which I would give up if I did it the same as the headboard and footboard (the slats are NOT glued, they are free so that they have room to expand/contract). The advice I got from the internet forum for the plans (I know...) was to construct the slats and the strip that holds the slats first (and screw and glue the slats in), and then glue the frame together around it. That seems risky, because I could wind up with a slat assembly that is 1/8" too short or long, which would really cause problems. I may default to the method in the plans...I was just hoping to avoid using plywood. As of now, everything is solid oak. Yeah..this thing is gonna be heavy. I'm hoping the result will be something the kid will have for the rest of their lives, and beyond.
By the way, it looks better in real life than in the images. It loses the look of the grain and the whatever-it-is-that-makes-red-oak-look-so-cool that it has in real life. Should stand out better once I put the finish on.
-m
![]()